Blackboard Mobile App
Blackboard Mobile App
With the Blackboard App, you can access the information you need, connect with your peers, and customize your learning experience – all while on the go. By putting the power of education in your hands, we ensure you stay connected to your academic journey, no matter where you are. The Blackboard Learn app is designed specifically for you to view content and participate in your courses.
If you’re already familiar with the Blackboard environment on your computer, you’ll feel right at home using the Blackboard App. With a sleek design and optimized screen size, you’ll find everything you need just a tap away. Get ready to experience the familiar world of Blackboard in a whole new way!
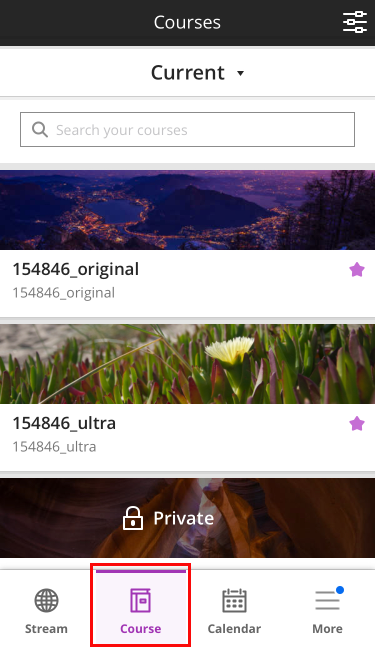
So the items that are displayed on the menu are the following:
- Courses
- Activity Stream
- Calendar
- More
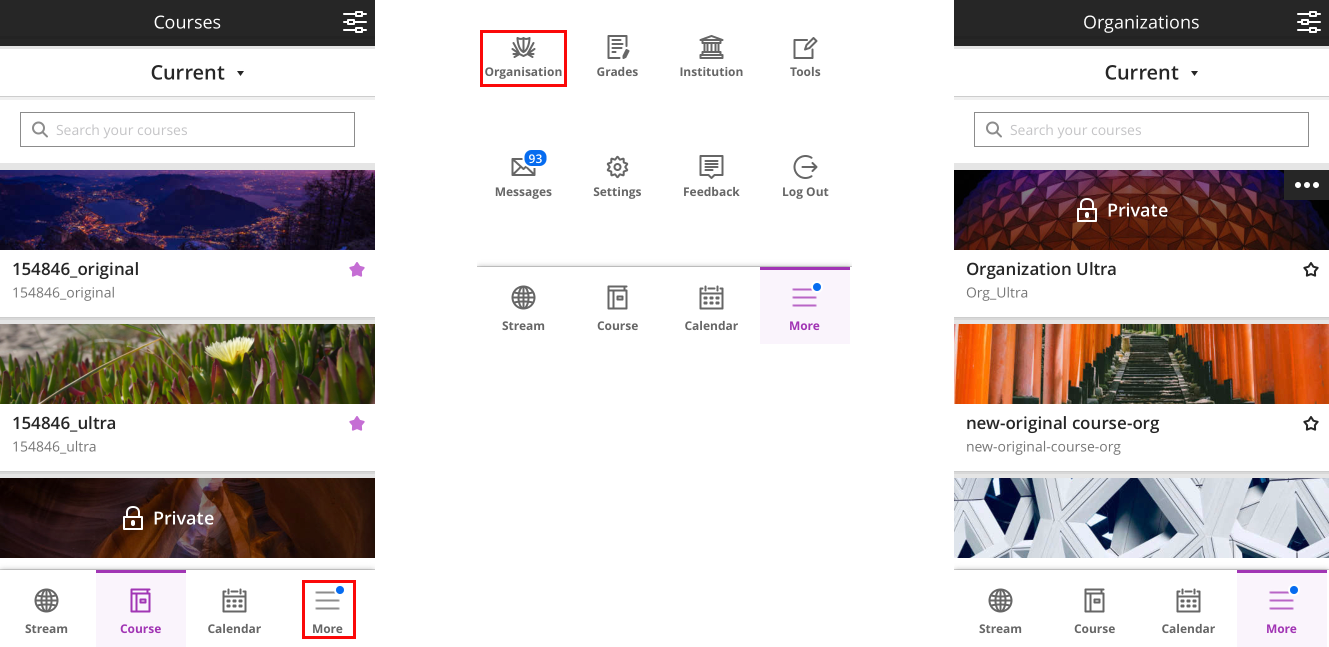
In the “More” button at the bottom right corner of the app to access:
- Profile
- Organization
- Grades
- Institution
- Tools
- Messages
- Settings
- Feedback
- Log Out
You can stay updated with the latest course activity, such as new content, announcements, and grades, using the Blackboard Learn app. The activity stream automatically arranges the items to help you prioritize your tasks and focus on the ones that require immediate attention.
To start working on an item, simply tap it in the stream. If you’d like to view the course outline instead, tap the linked course title within the item.
Stream items
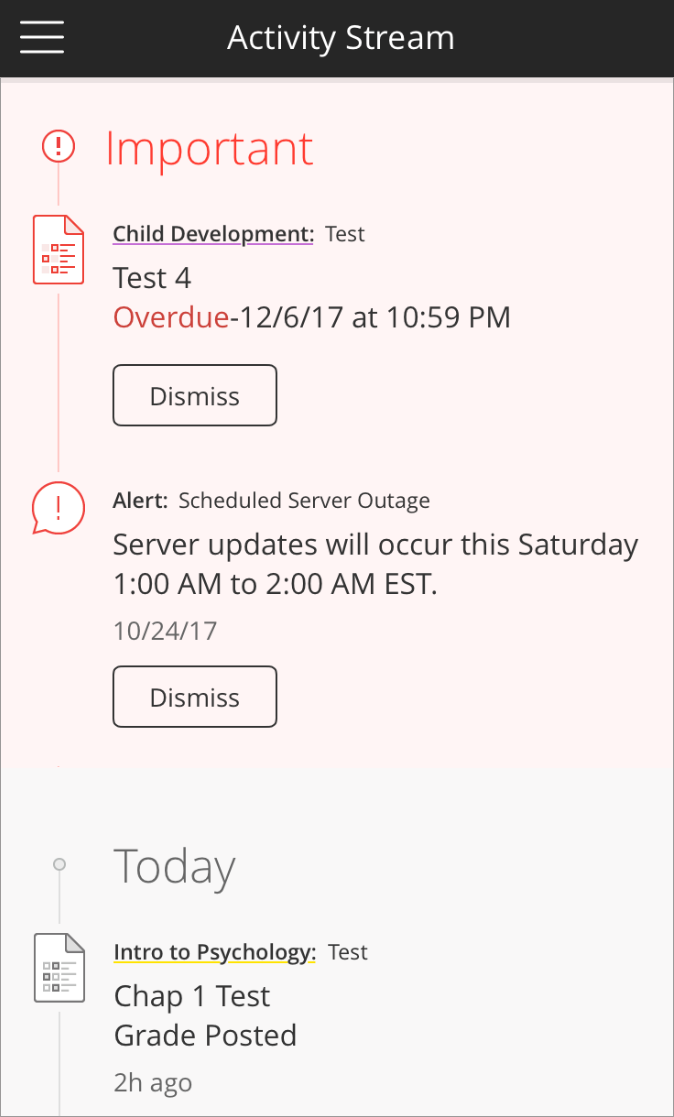
These items show in your activity stream in the app:
- Alerts from your school
- Course announcements
- Tests and assignments that are due today or this week
- Instructor changes to due dates
- Calendar events for today and the week
- Instructor changes to events
- Grades posted for tests, assignments
- Item added for course items, assignments, tests
- Missed, overdue, and completed assignments and tests
Dismiss items
After reading the items in the Important section of the app’s activity stream, you have the option to dismiss them. When you dismiss a course announcement, it will no longer be visible on the app’s Activity Stream across any device. However, the announcement can still be found under Announcements in the course. If you dismiss a system announcement, you won’t be able to access it temporarily on the app. But, it may reappear later. It’s important to note that dismissing announcements in the app does not affect your web view of Blackboard Learn.
Courses and Organizations
Finding Courses. Select the Courses button in the main menu to see all the courses where you’re enrolled as a student.
Finding Organizations
If you want to see the list of organizations where you’re a member, simply click on the main menu icon and select More, then choose Organizations. These organizations function like courses and offer various tools to facilitate communication among members. Once you become a member or leader of an organization, you’ll be able to access its content, view, and post announcements, as well as participate in or moderate discussions.
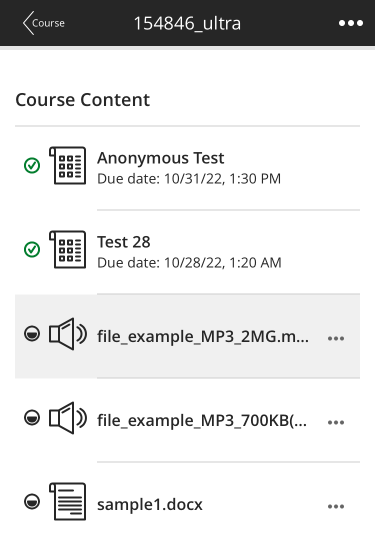
Course Content
Course Overview
Your courses may look different than they do in a web browser, but you’ll easily navigate through your content. From the course list, tap a course card to see the following items:
- Course Materials
- Grades
- Announcements
- Course content
- Discussions
Within the app, you can view all the folders, documents, and assessments, as well as other items, that are available in the web browser view of the course.
Compatible file types
The Blackboard Learn app supports most file types that can be viewed in the web browser view of a course. You can easily view documents such as Microsoft Word, Excel, PowerPoint, and PDF files.
Supported course content
The majority of your course content can be viewed directly in the app, while the content that is not supported opens in the app’s web browser. Please note that the Blackboard Learn app operates through a collaboration between our software and your school’s server, and we cannot guarantee compatibility with all user-generated content. In case of limited features or functionality due to outdated software or server outages, please contact your instructor. If you encounter any items you can access on the course website but not in the app, please reach out to your instructor for assistance.
Tests and assignments
Tests and assignments are included in the Course Content. If you’re a student, you can view an assessment’s details, complete the attempt, and submit it within the app.
Assignments
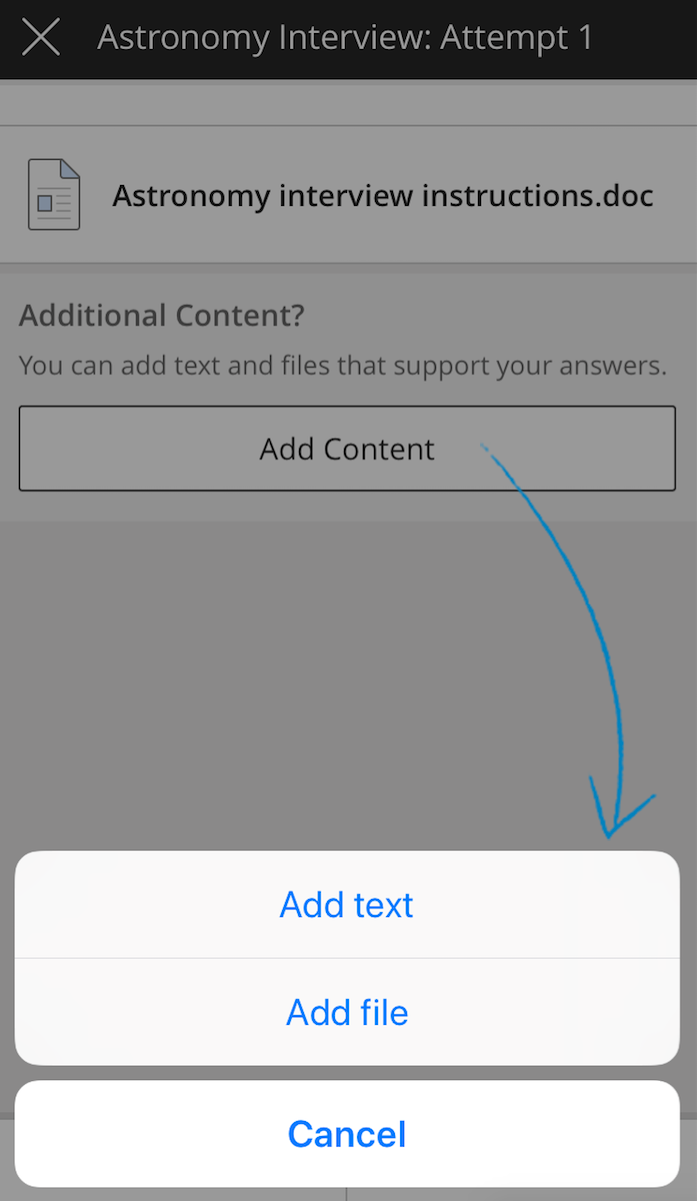
To access an assignment, you can navigate to Due Dates in the menu or a course. Once you find the assignment, read the details carefully. In the app, if it’s an Original course, the assignment instructions will appear after you begin an attempt. However, for Ultra courses, the description is shown before you start the attempt. Next, tap Start Attempt and proceed to complete the questions. You can add content by tapping on the ‘Add Content’ button. When you are done working on the assignment, you can either save it for later or submit it.
Tests
You can access tests from the activity stream, Due Dates in the main menu or within a course, Grades in the main menu or within a course, or a course’s content.
Take a test
To take a test, you can access it from the Due Dates section either in the course or the menu. Once you are on the test details page, click on Start Attempt to begin. Answer all the questions and click on Save for Later if you need to continue at a later time, or Submit to turn in your test.
Course Messages
Utilizing the Blackboard app facilitates seamless communication with your peers and fellow course participants via course messages. Through this platform, you can swiftly send and receive text messages, including media attachments. Additionally, the app provides push notifications for course messages, ensuring timely updates. This feature conveniently confines your message interactions within the course environment, streamlining the tagging or addition of recipients. Accessing course messages on the Blackboard app is easily accomplished through the course messages page.
Ultra: Create a course message
To initiate a message through the Blackboard app, begin by choosing the specific course of interest. Proceed to the Course Material section and locate the Messages bar. Within this section, click on New Message and input the recipients along with the message subject. You have the option to direct the message to specific individuals or all members of the course. To do this, simply start typing the recipient’s name in the designated text box or enter “all course members.” Once your message is composed, click the paper plane button situated in the bottom right corner to send it.
For a quick message creation while on the move, follow these steps using the Blackboard app:
-
- Select your desired course.
- Access the Messages bar within the Course Material section.
- Opt for New Message and specify recipients, including the message subject.
- Craft your message.
- Utilize the paper plane button in the bottom right corner to dispatch the message.
- Choose recipients individually or designate All course members by entering the respective text in the recipient text box.
Ultra: View and reply
If you enable notifications on your mobile device, you will receive push notifications whenever you receive a message from your course instructor or fellow course members. To read the message, you can either tap on the push notification directly or go to Courses > Messages > Inbox. Once there, you can select the specific message you wish to respond to and click on the Reply option. Craft your response in the provided text box, and you even have the option to include media using the text editor. When you’re ready to send your reply, simply tap the paper plane button located at the bottom right corner of the screen. Ultra treats your reply in a conversational manner, similar to modern messaging applications.
Ultra: Push notification
To keep abreast of the most recent messages from your instructor or peers in the course, you can activate push notifications. These notifications act as a real-time communication avenue within the course community. You have the flexibility to enable or disable this feature according to your convenience. To accomplish this, navigate to the Settings menu and choose Push Notifications. Then, utilize the toggle button to enable or disable push notifications according to your preference.
Ultra: Add rich text and media to your messages
When creating a message or replying to one, you have the flexibility to incorporate diverse media formats, including PDFs, GIFs, and images. To attach images from your device, just click on the paper clip button available on the inbox screen. Moreover, you can utilize the camera button to capture a picture directly from your device and promptly send it to the intended recipient.
Ultra: Delete a message
It is possible to delete any course message by following these steps:
1. Go to your course messages inbox.
2. Choose the message you wish to delete.
3. Click on the menu button located in the top right corner of the screen.
4. Select the “Delete” option.
Offline Content
Select content to download
Be proactive in your preparations! When you have access to the internet, take the opportunity to download content that you intend to view offline.
You can choose between downloading all course content that supports offline access or opting for specific files. This can be executed either at the Course Content level or at the folder level. Whether you decide to download the entire offline-supported course content or select individual files, the choice is yours.
- While online, open the app and access a course.
- Access Course Content. You can stay here or open a folder.
- Tap the offline options button.

- You can download all of the listed content or select individual items.
- Tap Download all content to get all offline-supported content at once.
- Tap Select content to download to choose specific items. If you clear a check box, that content will be removed from the course downloads. You won’t be able to view that item the next time you’re offline.
- Tap Update.
- Your selected content begins to download. Depending on file sizes, this can take some time.
If you opt to download a specific folder, all its content and subfolders that support offline access will be automatically included for download. Upon returning to the download section and selecting “Select content to download,” you will find your previous choices displayed. To modify your offline content, simply uncheck the respective checkboxes next to any items you no longer wish to retain on your device for offline access. This provides a convenient way to manage and customize your offline content selections.
View offline content
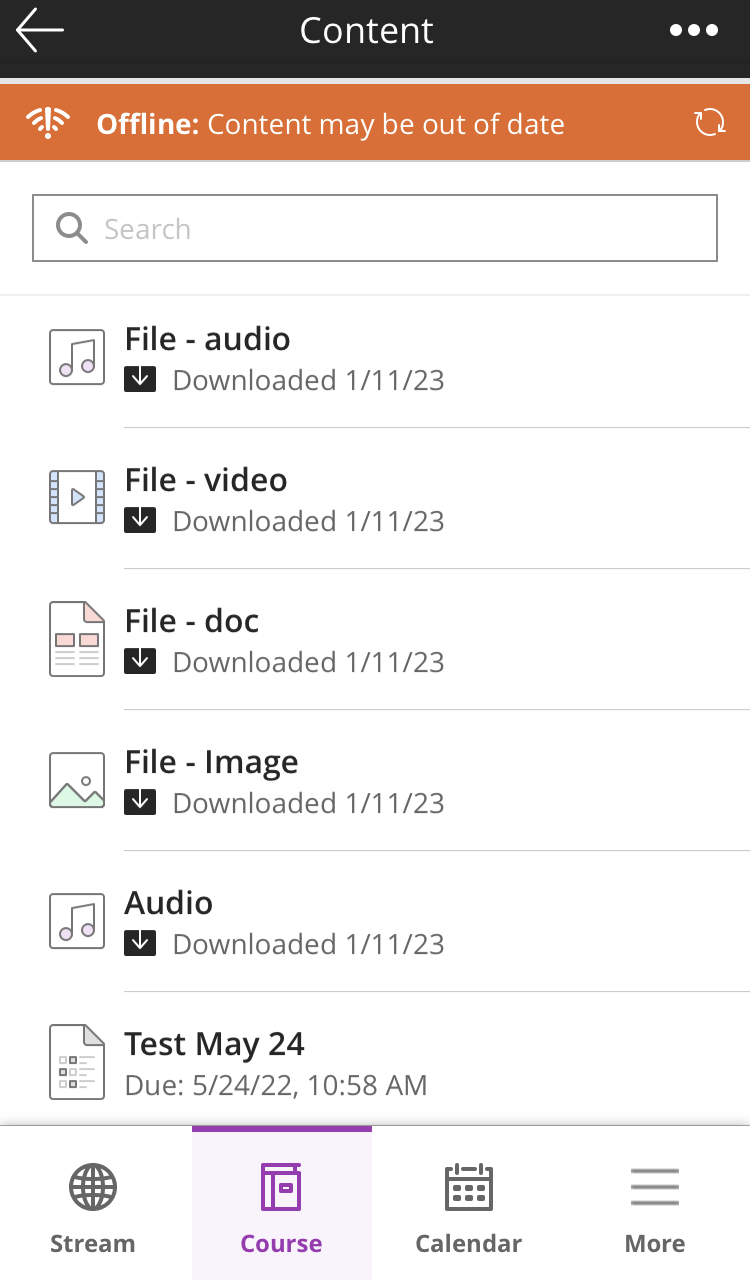
When utilizing the Blackboard Learn app without an internet connection, the app displays a header message signaling that you are in offline mode. It’s important to note that if you’ve been offline for an extended period, the content you encounter may be outdated.
- To enter offline mode, either activate airplane mode on your device or disable Wi-Fi.
- Within the app, navigate to a specific course.
- Access the Course Content section.
- Tap on any item featuring a download arrow icon to preview it. Items that cannot be viewed offline will appear in gray.
If certain items in a folder or parts of an item are not compatible with offline viewing, the folder or item may only download partially.
Delete offline content
If some items within a folder or certain portions of an item cannot be viewed offline, only a partial download may be completed.
Downloaded content uses storage space on your device. When you need to do some cleanup, you can delete offline content.
For all courses at once
-
- Go to the main menu and select Settings.
- Select Offline Content.
- The Downloaded Content section shows you how much space your downloads use and how much space you have left.
- Tap Downloaded Content to delete downloaded content for all courses at once. You can return to a course and download the content again.
For a single course
-
- In the app, access a course.
- Access Course Content. If necessary, select a folder.
- Tap the offline options button.
- Tap Delete all downloaded content.
To remove downloaded files of specific content in a course, follow these steps: First, open the course in the app. Then, navigate to the Course Content section and select a folder if needed. Next, click on the offline options button or the three dots at the top-right corner. Tap on Select Content to download and uncheck the box for the content item whose downloaded file you want to remove. Finally, click on Update to complete the process.
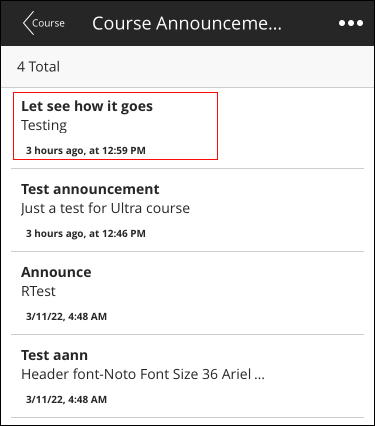
Announcements
To view announcements for Ultra courses, follow these steps:
- Select the Ultra course from the course list
- Under Details & Actions, select Announcements
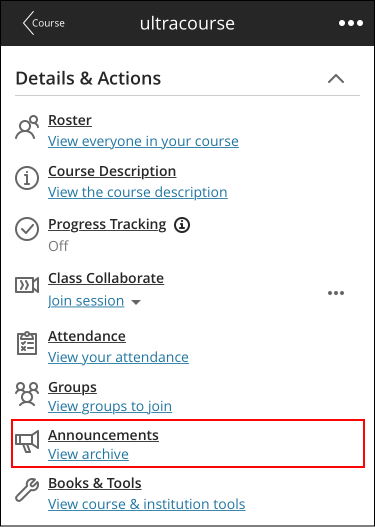
- Scroll to view all the announcements. To review the latest announcements, check the Date and time information.
Journals
A journal serves as an individualized platform for private communication between you and your instructor or fellow students, contingent on your role within the course.
This tool can be employed as a means of self-reflection, allowing you to express your thoughts, opinions, and course-related concerns. Additionally, journals provide a space for collaborative discussions and analyses of course materials.
Your instructor may choose to evaluate and grade your contributions to the journal, or utilize them solely for communication purposes. Regardless of the approach, the flexibility exists for you to make multiple entries within a journal.
Discussions
Participate in discussions
Engaging in course discussions is a dynamic process that allows you to read existing threads, initiate new conversations, and respond to posts from your peers. Upon choosing a specific discussion, tap on “Start Thread” to kick off a new conversation. Compose your message, and when ready, tap “Start now” to post it and contribute to the ongoing discussion. This straightforward process facilitates active participation and interaction within the course forum.
Edit and delete posts
The ability to edit or delete your posts in a discussion is contingent upon your instructor’s settings for that particular discussion. If your instructor has granted you these options, you can modify or remove your contributions. However, it’s important to note that you cannot edit or delete posts made by others. If you need to rectify an error in your post and lack the option to delete it, contact your instructor for assistance.
To edit or delete your posts:
1. Tap on a discussion post or reply authored by you.
2. The options to “Edit” and “Delete” will appear. If these options are grayed out, it indicates that your instructor hasn’t enabled these functions for that discussion.
Due Dates
Due dates for all courses
To access a consolidated view of upcoming course items with assigned due dates across all your courses, tap the main menu icon and select “Due Dates.” In this view, your tasks are color-coded by course and organized by both day and week, facilitating a quick overview of impending deadlines. This allows you to efficiently identify what needs attention and prioritize your work accordingly.
For further details or to commence working on a specific item, tap on the corresponding entry in the list. This streamlined process enhances your ability to manage and stay on top of your academic responsibilities.

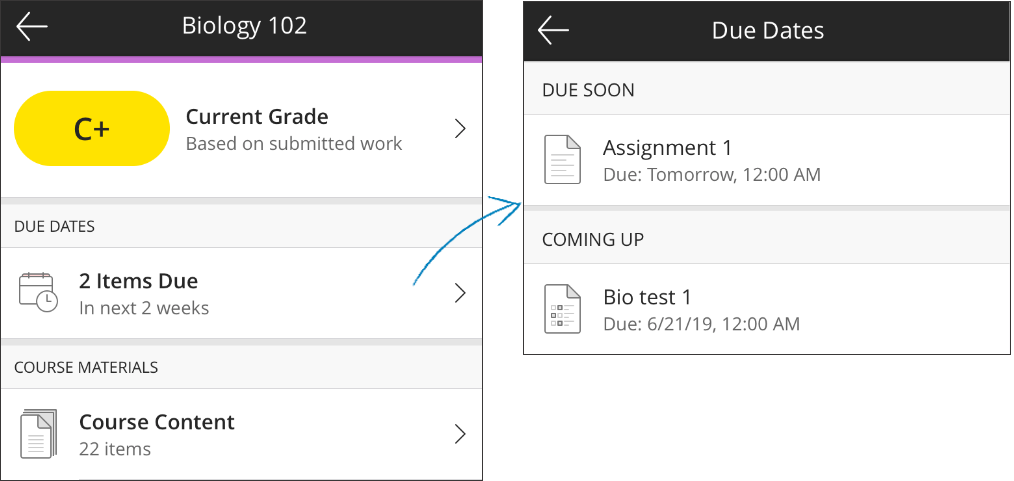
Due dates for individual courses
While navigating within a specific course, access the “Due Dates” section in the “Course Overview” to review course items with upcoming due dates for the next two weeks. The list is thoughtfully divided into two sections: “Due Soon,” which displays items due in the next two days, and “Coming Up,” which highlights items with deadlines within the next two weeks.
To delve into the specifics of a particular item or initiate your work, simply tap on the corresponding entry in the list. This feature provides a focused and time-sensitive snapshot of your impending course responsibilities, aiding in efficient task management.
Grades
You can access your grades in two ways.
- Grades on the main menu
- Course Overview in a course
Grades for all courses
To quickly grasp your overall grades for all courses, simply choose “Grades” from the main menu. The format in which grades are presented—whether as letters, percentages, or points—varies based on your instructor’s settings for each course.
If you wish to delve deeper into your performance in a specific course, selecting the corresponding course grade within this section provides a comprehensive view of your graded assignments and assessments. This streamlined process facilitates effective monitoring of your academic progress across all enrolled courses.
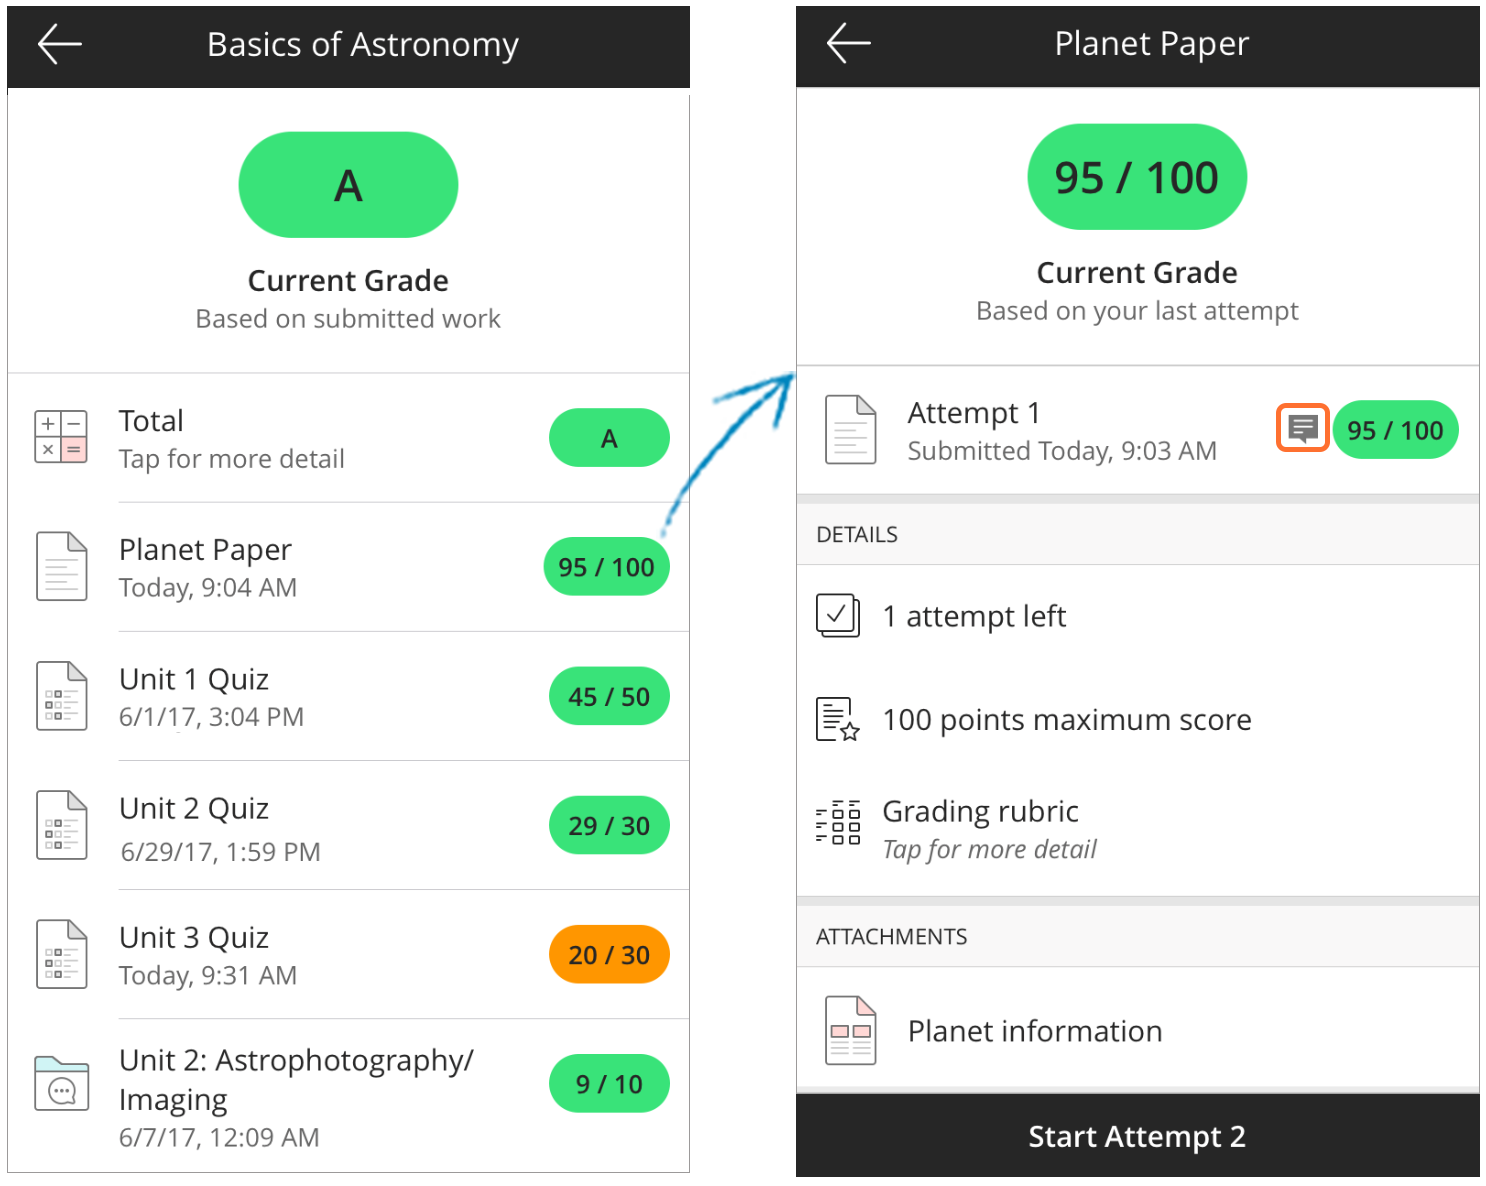
Grades for individual courses
In a specific course, locating your current grade is a straightforward process at the top of the “Course Overview” section. By selecting the displayed course grade, you gain immediate access to a detailed breakdown of your graded assignments and assessments within that course. This direct method offers a quick way to stay well-informed about your ongoing academic progress within the specific context of the course in which you are currently enrolled.
View your graded work
In a particular course, finding your current grade is a simple task located at the top of the “Course Overview” section. By selecting the displayed course grade, you instantly access a detailed breakdown of your graded assignments and assessments specific to that course. This direct approach provides a swift means to stay thoroughly informed about your continuous academic progress within the context of the course in which you are presently enrolled.
- When you select a graded discussion, the entire discussion is displayed. To view a collection of your posts only, access your course on a web browser.
- If your instructor has associated a grading rubric with the item, you can find it under “Details.” In the app, you can view the rubric to see descriptions and point values for each criterion. However, to see the points earned, written feedback for each criterion, and overall rubric feedback from your instructor, access your course on a desktop web browser.
- If your instructor uses calculated grades, such as running totals, selecting a graded item allows you to view its details, a list of your attempts, and the dates and times you submitted. This comprehensive approach ensures you have access to all relevant information regarding your graded discussions and assignments.
View feedback
For tests and assignments, your instructor may provide feedback on your attempt with your grade. The feedback you see in the app differs for Ultra and Original Courses.
Ultra course test and assignment feedback:
- Rich text
- File attachments
- Multimedia
- Inline grading notes on submitted files
Cloud Storage
iOS
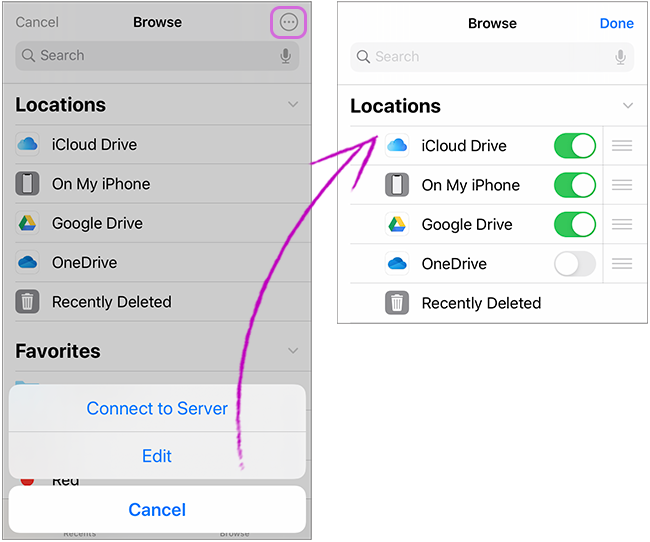
The Blackboard app seamlessly integrates with the iOS Files app, allowing you to attach files from your device or various cloud services. This includes access to third-party cloud storage platforms like iCloud, OneDrive, Google Drive, or Dropbox.
It’s important to note that the Files app on your Apple device serves as the gateway to your different cloud storage accounts within the Blackboard app. The previously existing “Linked Accounts” area has been removed from the app’s Settings. Therefore, to manage and access your cloud storage accounts, utilize the Files app on your iOS device for a streamlined and efficient file attachment process in the Blackboard app.
Add a cloud account in the Files app
- Install a cloud storage service app on your device and log in to the service. For example, install the Google Drive app and log in.
- Open the iOS Files app on your device.
- Tap Browse to access a list of file storage locations.
- Tap the three dots at the top of the screen and select Edit.
- Slide to turn on the third-party apps that you want to access in Files.
- Tap Done. Now, wherever attachments are available in the Blackboard app, you can select Files and access those cloud storage services.
Android
- Install a cloud storage service app on your device and log in to the service. For example, install the Google Drive app and log in.
- From a test or assignment attempt in the app, tap Add Content. From a discussion reply, tap Add files.
- Select an area on your device storage or a cloud storage service. If you don’t see the list of all available areas, tap the menu button to return to the Open from the menu and select a different file location.
- If necessary, use the cloud service prompts to sign in.
- Select a file to attach.

Profile
Add/change/remove your profile picture
Here are the steps to add or change your profile picture in the Blackboard Learn app:
- Go to the bottom menu and select More.
- Tap on the avatar or current profile picture next to your name to view the Change Profile Picture options.
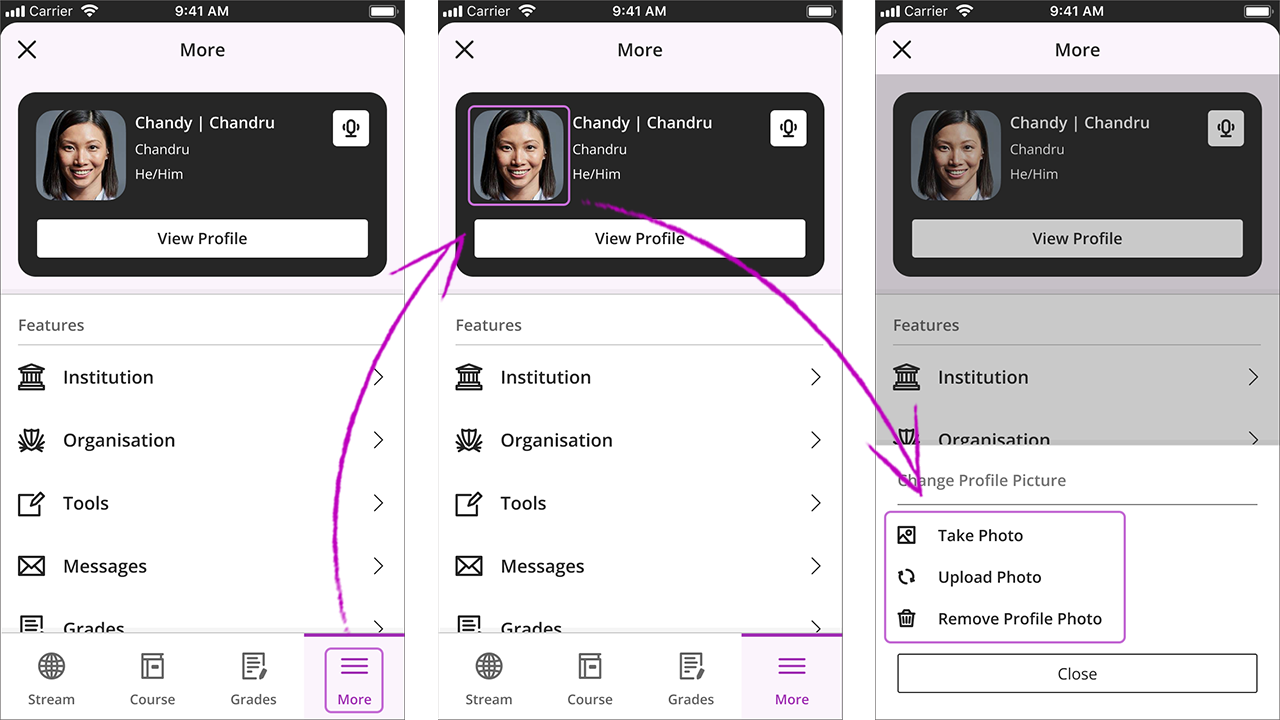
- You can either take a photo with your device’s camera or upload a saved image. Make sure that the Blackboard Learn app has permission to access your camera and photo library.
- Adjust the image as needed and select Save.


- A confirmation message will appear once the picture has been uploaded. Select Close to finish.
If you want to delete your profile picture, follow these steps:
- Go to the bottom menu and select More.
- Tap on your current profile picture next to your name to view the Change Profile Picture options.
- Select the Remove Profile Photo option and confirm your action by selecting Delete.
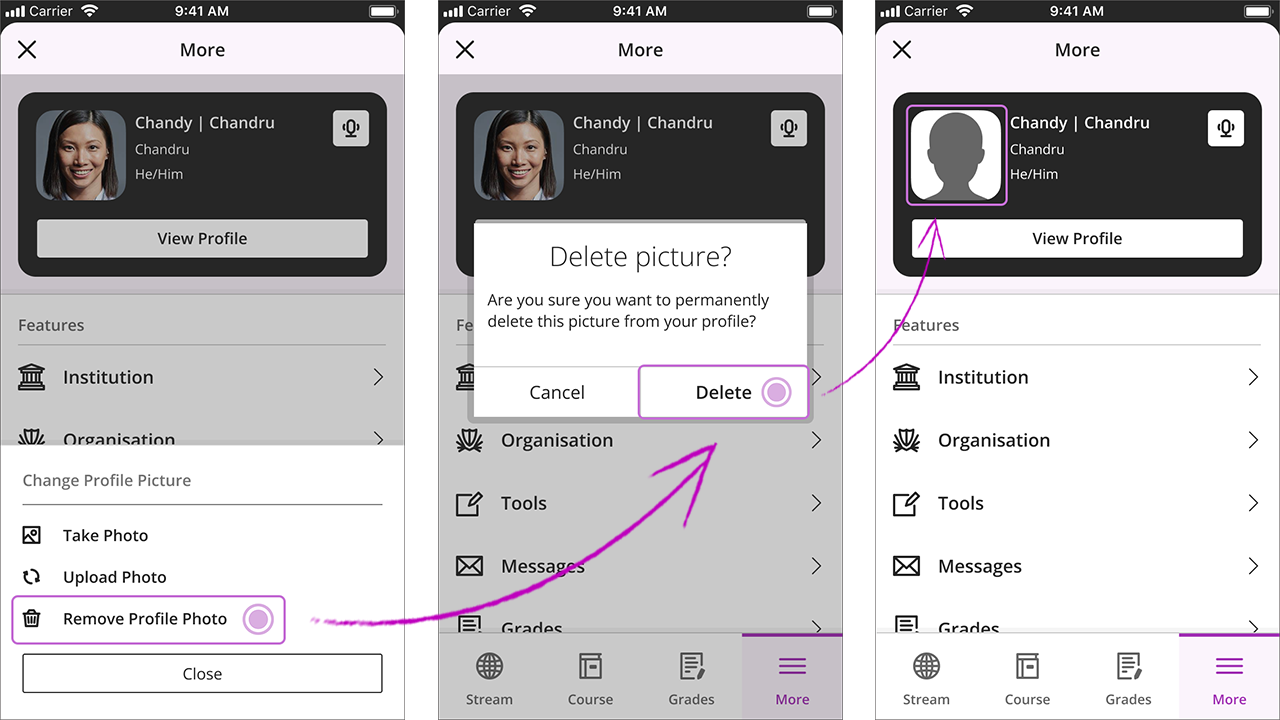
- A confirmation message will appear once the picture has been deleted. Select Close to finish.
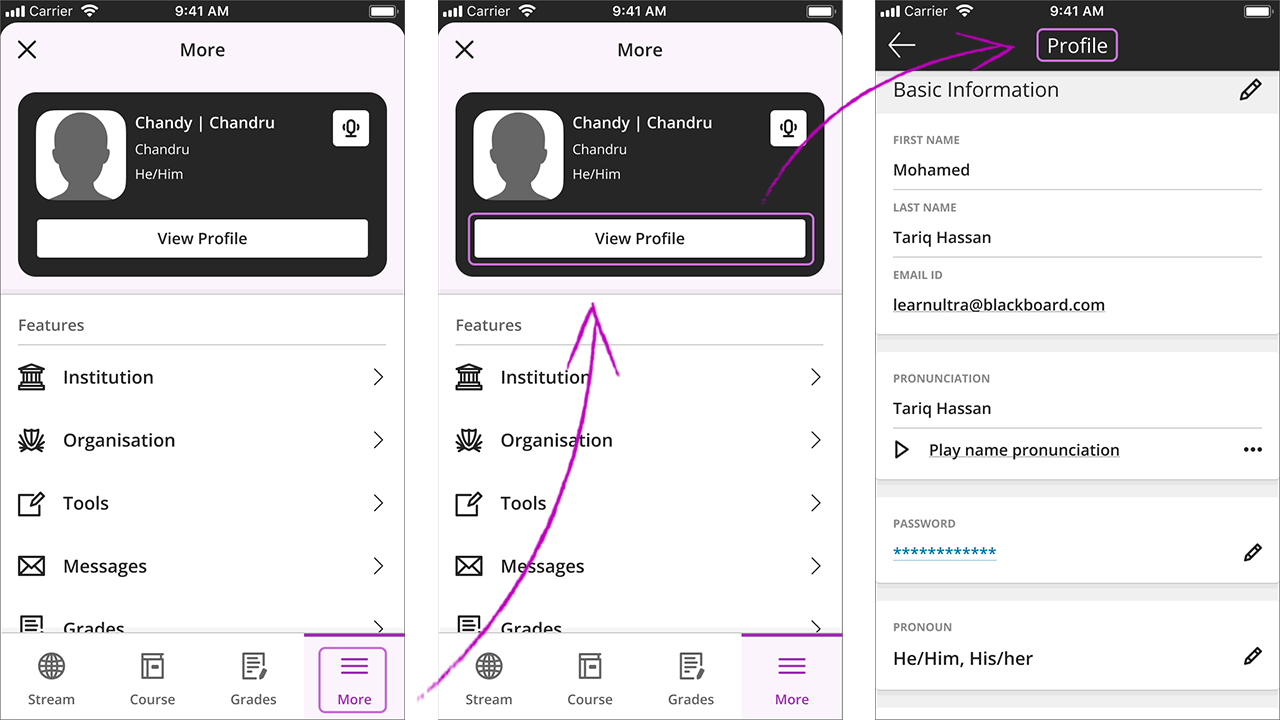
View your profile information
- To access and review your personal information in the Blackboard app, follow these steps:
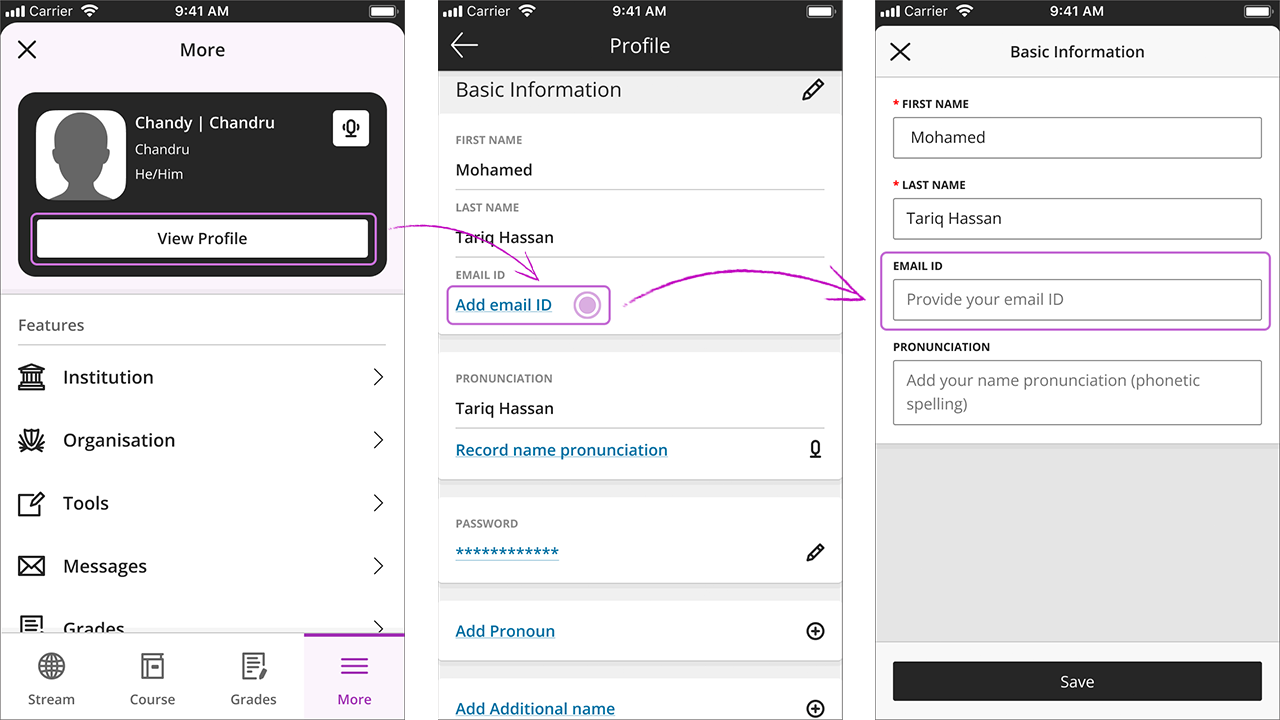
- Go to the bottom menu and select “More”.
- Choose the “View Profile” option. Within the “Profile” panel, you can scroll down to view various categories of personal information, including:
– Basic information: This includes details like your name, email, and pronouns.
– Additional information: Here, you can find details such as your gender, birthday, and education level.
– Contact information: Your mailing address and phone number are provided in this section.
– Job information: This category displays your job title and department. By navigating through these sections, you can conveniently access and review the diverse aspects of your profile within the Blackboard app.
Add/edit/remove your profile information
You can add information in the empty fields on your profile as follows:
- Go to the bottom menu and select “More”.
- Select “View Profile”.
- To fill in the empty fields, you can either select the pencil icon in the section you want to complete or select the blue text in the field you want to fill out
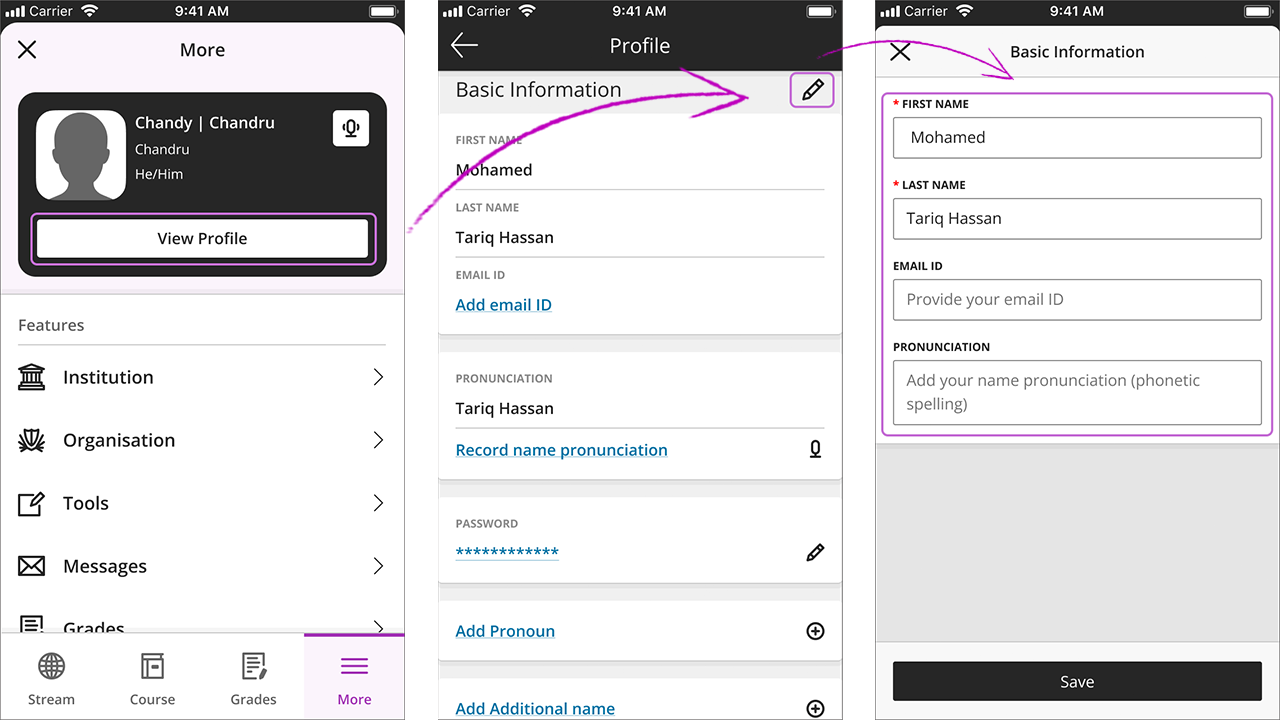
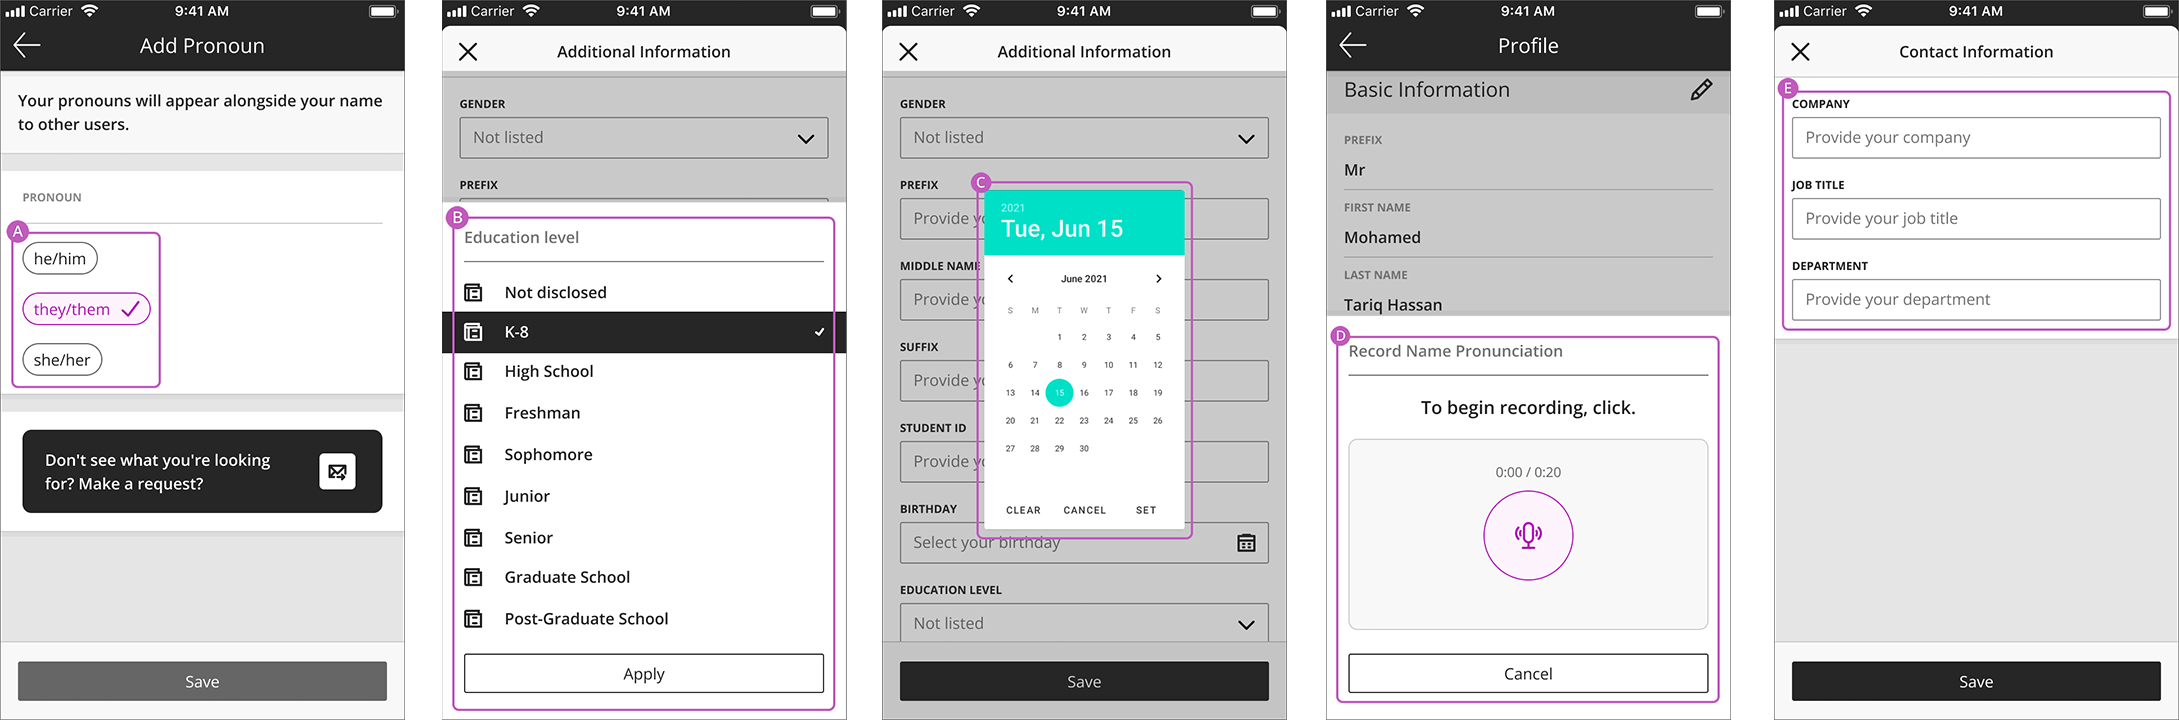
- Depending on the type of information required, you will need to either A) select an option, B) choose an item from a dropdown list, C) select a date on the calendar, D) record a voice note, or E) provide an open-ended response in a text field. Bellow you can find some examples:
- Confirm your actions by selecting Save.
You can edit your profile information by following these steps:
- Go to the bottom menu and select More.
- Select View Profile.
- Select the pencil icon on the section of your profile that you want to edit.
- Confirm your changes by selecting Save.
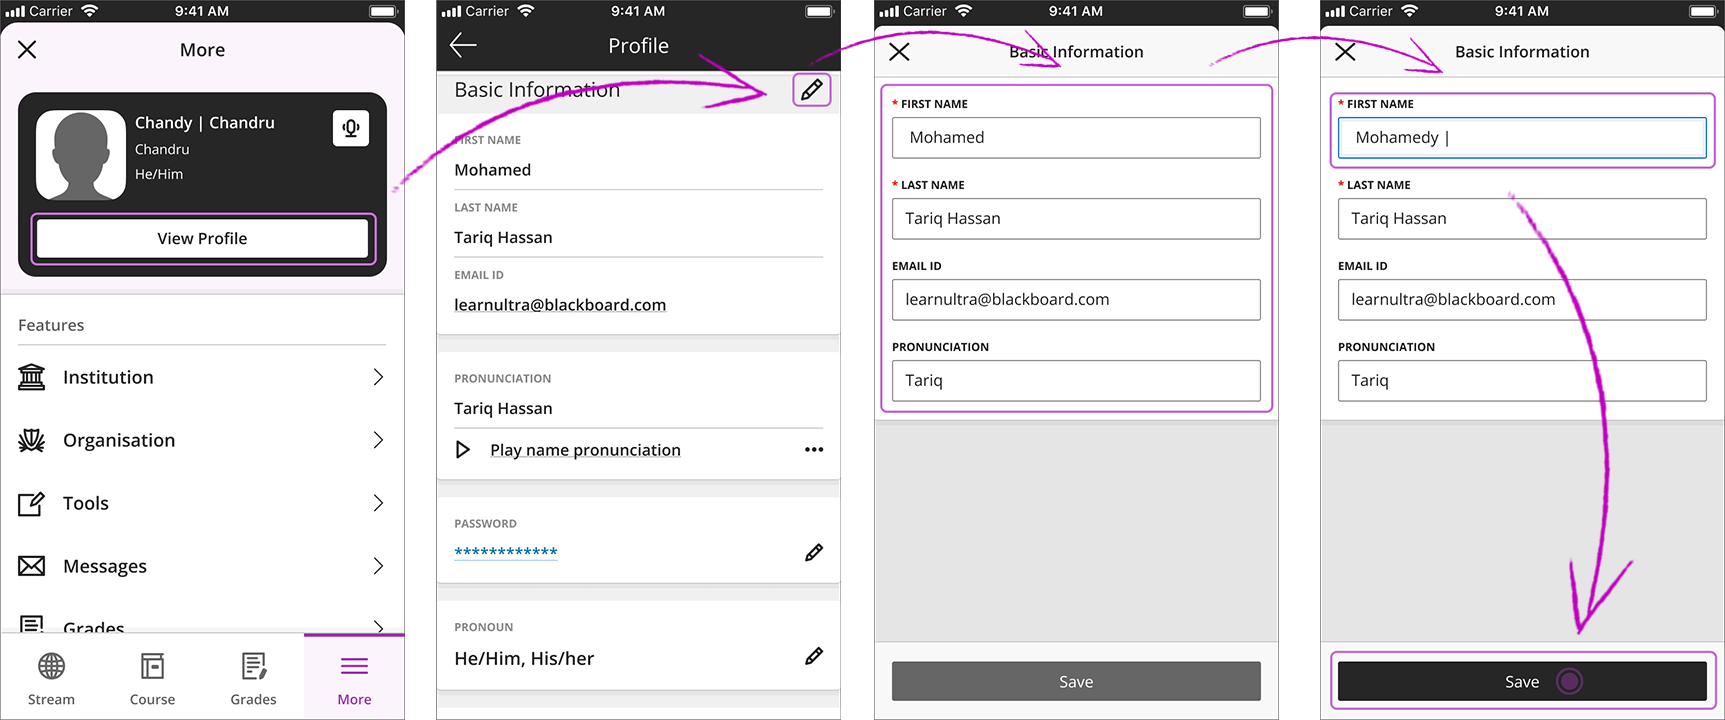
Please note that the Save button will only be activated once you have made at least one change to your profile.
By following these steps, you can easily remove information from some of the fields by leaving the space blank, as long as they are not mandatory. In such cases, the Save button will be deactivated until you fill the required information.
